[ Setup article ]

How to publish your DMARC Records on Cloudflare in 3 steps

1 min readBy Team EA

DNS record editor showing the Name, Type and Value columns
  1. Log in to your Cloudflare account.
  2. Navigate to your dashboard, locate the domain you wish to add the DMARC record to, and click on the ‘DNS’ button.
  3. On Cloudflare’s DNS management page, enter the following details and click the ‘Add Record’ button:
    • From the ‘Type’ drop-down list, select ‘TXT’
    • In the ‘Host’ field, enter ‘_dmarc’
    • In the ‘Value TXT’ field, enter the record sent to you by email or generated using EmailAuth’s DMARC Generator.
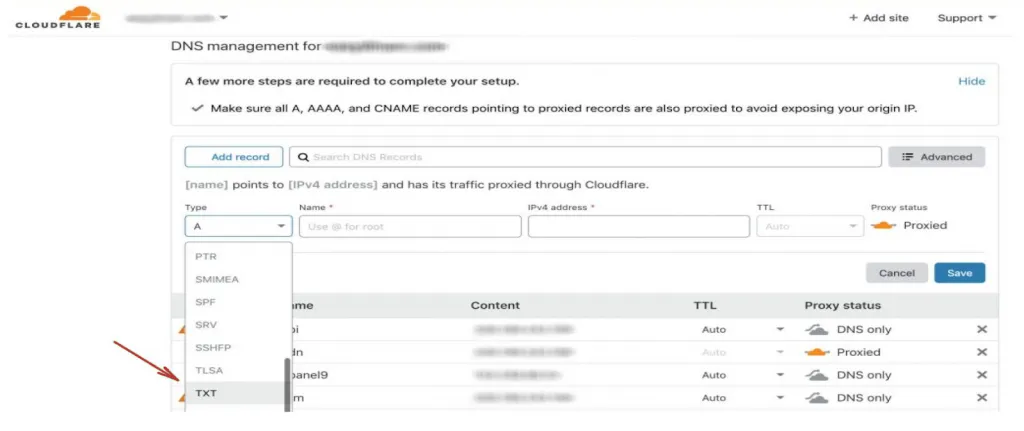
DNS record editor showing the Name, Type and Value columns

You have now successfully added the record!

Check the published DMARC record using EmailAuth’s DMARC validator. It may take anywhere between 24 to 72 hours for the record to reflect in your DNS.

[ DMARC guide ]

Part of the Knowledge BaseDNS-provider publishing guides · 39 guides

Enterprise provenance

Why top financial institutions and governments retired their email security dashboards.

Traditional email authentication platforms sell you a dashboard and ask your engineers to do the labour. In high-stakes environments, manual oversight means delayed enforcement, configuration drift and unmonitored shadow domains.

EmailAuth is the agentic email provenance platform. Our agents enforce p=reject, keep third-party senders aligned and move your domains to full RFC 9989 compliance, the new DMARC standard,, with human-in-the-loop auditability.

Governments Large enterprises Tier-1 financial institutions

SaaS · Dedicated tenancy · Air-gapped on-prem · BYOK encryption

[ Keep reading ]

All posts